POSTS
PORTFOLIO
SEARCH
SHOP
  • Your Cart Is Empty!
Your address will show here +12 34 56 78
Photography, Photoshop
My last big photo trip was Sri Lanka and I’m getting ready to go to Nepal at the end of April. For the first time for me, I  wanted to try and publish at least one image a day on Flickr as we traveled.  I have been known to hide images (read – not touch them!) for ages. The difficulty I’ve always had is that I just could not put up with the hassle of brstart screen
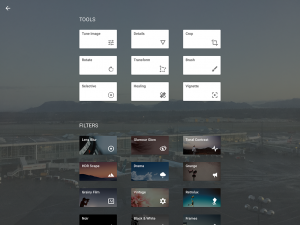
inging a laptop. On the Sri Lanka trip, I was armed with a couple of eyefi cards, an iPad mini and SnapSeed and that  was enough to be able to download and edit image for the web. SnapSeed is an incredibly capable image editor, particularly for global edit. One issue I had from the start was the eyefi cards – they are not the fastest cards on the market and particularly hitting play to show someone their photograph was an extremely frustrating exercise.

This year, I’m going to rely on the built-in wi-fi in the Fuji X-T1 and bring some faster memory cards.
The SnapSeed start screen (left):
This is the screen that displays the editing tools available to the user. The ones I used most were – Tune (brightness, contrast, shadows, highlights, warmth) – Details (Sharpness and structure) –  Crop – Vignette   Controls are really simple and most are operated using finger sliders.  

For the curious, here are some sample screenshots from the SnapSeed app on iOS


 Some images that were only only edited in SnapSeed


Overall, this workflow is great for simple edits & tweaks, particularly for publishing on social media like flickr. For any serious editing, I’ll be staying with my current workflow of Lightroom and Photoshop.       For those who are interested, click on the flickr logo above to browse my flickr stream
0

I was reading an article on Photoshop CS5 when it came out first and it mentioned that one of the new features was “the most advanced sharpening algorithm ever”. As sharpening , particularly with digital images, is critical to making the most of your images, I was keen to try out this brand new way of sharpening!. startNow its probably worth looking at the regular sharpening tools and how you might use them (or at least how I use them). If you are like me, then you probably reach for unsharp mask first to deal with most sharpening needs. For the most part, this discussion is primarily aimed at sharpening portraits so I normally don’t want to sharpen everything and usually end up duplicating layers  and masking off parts of the image. So for this exercise, I’m going to use this image of a young boy I took in Uganda. For the purposes of the comparison, I’m going to focus on sharpening the eyes  . The image was taken on a 5D with a 24mm prime lens, shutter speed is 1/60th of a second at F/13. In the next few sections, I’ll run through the different sharpening techniques and the settings used.   So first up, lets look at the traditional Unsharp mask: unsharp Typically, settings for the most common Unsharp mark requirements are Amount – 100 to 180 Radius  – 1 to 2 Threshold – 1 The actual amounts depend on the actual image and there are some who advocate: Amount – 250 to 300 Radius – 0.25 to 0.4 Threshold – 1 I have to admit, I’ve never seen a big difference – but I would definitely encourage  experimenting to find results that suit the image being worked on.   Next up is the Hi-Pass filter: hiPassDiag hiPass This is a sharpening method when I want a coarse or grungy feel to the portrait. It does not really suit a portrait of a young boy. For those not familiar with this method of sharpening, look out for a future post of this!       The previous techniques are really designed for global sharpening, where in the main, you need to sharpen the entire image. This next technique is designed just to sharpen localised areas. The Sharpen tool The sharpen tool has been in Photoshop for quite some time (maybe even since the beginning) but it traditionally has been a very coarse and destructive method of sharpening – the type of thing you try once and swear never to bother again! However, this is where Photoshop’s new enhanced sharpening algorithm is hidden! sharpenTool To activate the tool, click and hold on the blur tool and choose the sharpen tool. This tool is used as a brush and you can brush on the areas you want to sharpen.         Sharpen options sharpenOpts The “Protect Detail tick box is what makes this sharpen tool different from the sharpen tool in previous versions of Photoshop.  So to use the sharpen tool on the eyes of the portrait, make sure the “protect detail” box is checked and set the strength to around 30%   Sharpen tool with protect detail ticked                                                          enh-sharpen Sharpen tool, with protect detail un-ticked oldsharpen So, there are a couple of simple sharpening techniques. There is no “best one” for all images and in a lot of cases,  a combination of techniques works best! I’ve included the Photoshop PSD file use to generate the above images, with the individual layers so you can see the effects of the different sharpening techniques more closely . [dm]3[/dm]
3

I had a bit of a discussion last night about Photoshop and I had thought I had done a piece on smart objects previously. Anyway, I did not so this will correct the omission. I’m going to talk about one use of smart objects, one I use all the time. I’m going to use an image from our recent weekend in Clare with Celbridge Camera club. Its nothing special, but its ideal for demonstration purposes. Start Image So, not the most exciting image in the world, but here’s what I did with it. I work with Lightroom so that’s my starting point. I don’t apply any changes in Lightroom. For the purposes of this exercise, I am assuming that we are working with raw images (You do shoot in RAW, don’t you!). From Lightroom, right on the image, click on “Edit in” and choose “Open as smart object” from the menu. Its a bit more complex in Adobe bridge; Right-click on the image, choose “Open in Camera Raw” and shift+left click on the open image button. Regardless of how you do it, the image will open open in Photoshop and should look like the image above. This image is typical of the averaging of exposure that most modern cameras will come up with on evaluative metering. What we are going to do next is to take advantage of the feature of smart objects that retains settings from actions. So, in the layers palette, right click on the newly created smart object and choose “New Smart Object via copy”. This will create 2 independent smart object layers with the raw properties attached. The exposure and other settings of each layer can be modified independently. If you create the copy layer any other way, the two layer are linked and the exposure controls will apply to both. Next, open the bottom layer and adjust the raw settings to something similar to the image above. In this case, we are exposing for the shadow areas and we can safely ignore the sky, I also set clarity and vibrance to boost the local contrast and colour intensity. The final setting used here are really down to personal taste and the great thing is that because its a smart object, you can go back and tweak them as much as you want! Next, double click on the top layer smart object. Again the camera raw interface will launch This time, ignore the foreground and concentrate on the sky and other lighter elements of the image. The two images should look something like the examples shown. The last thing to do is to mask the top layer to allow portions of the bottom layer to show through
  • Click on the top layer in the layers palette
  • Click on the layers mask icon  to add a layer mask
  • With a soft brush and paint in black to allow the bottom layer show through
The finished image: The raw image is available for download here: [dm]2[/dm]
2

I’m not a big fan of overly dramatic or fancy borders on images and apart for on-line display, I don’t really get into drop shadows, digital mattes or film border decorations. However, most images will benefit from a simple border and typically, I use 3 types of borders ( well 2 really, but the 3rd one is used an odd time). The most common border I use is a simple 5 or 5 pixel wide black keyline. This is a nice simple border and holds the image together. The next border I use is a heavy black border with a white keyline. This is especially useful for dark images and can enhance the overall image. The last border is the one I use the least – a simple white keyline border. The link below is to a download for the action to create these borders. Feel free to modify and distribute these as you see fit. If you want me to modify them, let me know.


0

Modern Digital cameras are very prone to delivering very flat, low contrast images, particularly if you shoot RAW (and you really should be shooting raw). There are lots of ways to deal with this from simply boosting contrast, adjusting levels to the deep dark secrets of Curves and curves adjustments. Each of these techniques have their place and there are images with which these techniques work perfectly. My particular preference in portraits is for a more intense look that I could not achieve using any of these techniques and the following is a workflow I have come up with which gives me images I am happy with. [column width=”50%” padding=”0%”] This is an image of an indian man I photographed in New Delhi a couple of years ago. The image appeals to me on a number of levels; the expression on the mans face, the weight of years evident in the lines of his face and the sadness in his eyes. I was not very happy with the intensity of the colours not the contrast in the image.
Step one for me was to duplicate the layer and change the blend mode to soft light. Soft light has a similar effect to overlay mode but just not as strong. Depending on your tastes, you can also change the opacity to reduce the intensity of the effect. In addition, to increase the intensity, just create a third layer with its opacity also set Soft Light. [/column] [column width=”50%” padding=”0″] [singlepic id=173 w=320 h=240 float=center] [/column] [end_columns] [column width=”50%” padding=”0″] [singlepic id=169 w=320 h=240 float=center] [/column] [column width=”50%” padding=”0″] [singlepic id=162 w=320 h=240 float=center] [/column] [end_columns] [column width=”50%” padding=”0″] Finally, I “sharpen” the image using a hi-pass filter. To do this, first add a new copy layer (the keyboard shortcut for this is CTRL+J). Then go to filter |Other| High-Pass. At this point, the image should go uniform grey. Slowly adjust the slider until detail starts to show through. The high pass radius setting you want will depend on the intensity of the sharpening you want to add – don’t be afraid to experiment to play with different looks. [/column] [column width=”50%” padding=”0″] [singlepic id=171 w=320 h=240 float=center] [/column] [end_columns] [column width=”50%” padding=”0″] [singlepic id=170 w=320 h=240 float=center] [/column] [column width=”50%” padding=”0″] [/column] This is the final image! You can click on any of the images to see a larger version of the image and see the effects more clearly. [end_columns]
1